الاستهداف في الفيس بوك
في الفيس بوك هنالك العديد من الخيارات لتطبيق الاستهداف الذي يناسبك بالإعلانات، التالي يوضح لك طرق الاستهداف في الفيس بوك:
- الجمهور المخصص
- الموقع الجغرافي
- العمر
- الجنس
- اللغة
- الاهتمامات
- الاستهداف الديموغرافي (السكاني)
- السلوكيات
- المواضع أو مكان ظهور الإعلان
- العلاقات Connections
- نوع الأجهزة المحمولة ونظام التشغيل
- المتصلين على شبكة الواي فاي من عدمها
دعونا الآن نتناول ملخص سريع عن كل فئة من أنواع الاستهداف في الفيس بوك لنبسط الأمور عليكم.
الجمهور المخصص
إن كان لديك قائمة من الزبائن ولديك البريد الإلكتروني لكل واحد منهم، هذا يعني إمكانية إعادة استهدافهم عبر الفيس بوك عبر ما يسمى بالجمهور المخصص Custom Audience.
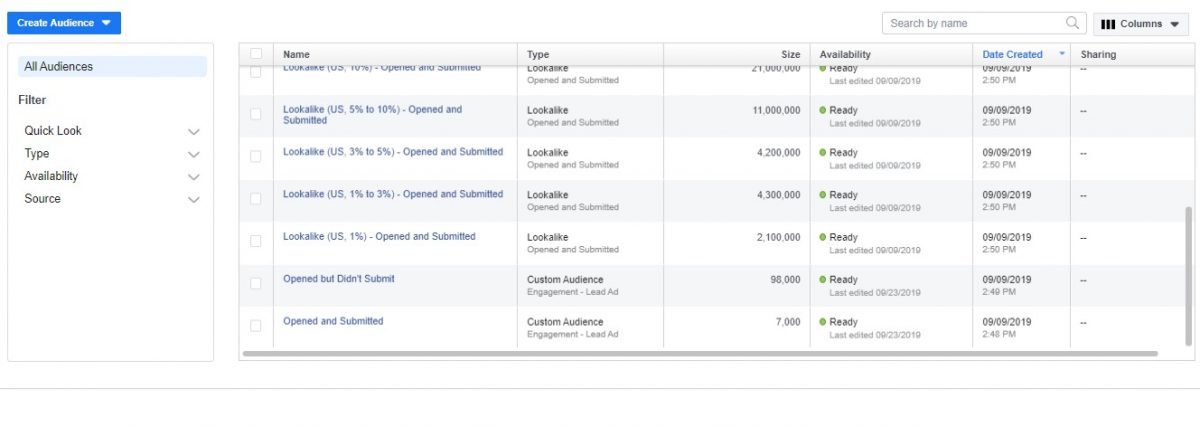
لو كان لديك قائمة من 1000 زبون سابق في آخر 90 يوم وترغب باستهداف جمهور مشابه، فما هو الحل وما هي الطريقة؟
الجمهور المشابه هو عبارة عن جمهور يشبه في سلوكاياته ونشاطاته في الفيس بوك مع الـ1000 زبون الذين تحدثنا عنهم سابقًا، ويعتبر الجمهور المشابه هو أفضل طريقة لزيادة مبيعاتك عمومًا.
نصيحة: لا تنشئ قوائم الجمهور المشابه ما لم يصل عدد القائمة الأصلية إلى 1000 حدث على الأقل، مثلًا لو كنت تريد إنشاء جمهور مشابه من قائمة تضم الأشخاص الذين قاموا بالشراء من موقعك الإلكتروني، افعل ذلك عند حدوث 1000 عملية شراء فأكثر في آخر 90 يوم بأقصى حد.
الموقع الجغرافي
من خلال الاعتماد على الموقع الجغرافي يمكنك تحديد البلد التي ترغب بوصول إعلاناتك إليها، ومن هنا يمكنك اختيار دولة كاملة، ولاية، مدينة، أحياء أو حتى الرمز البريدي، وبالتالي يمكنك الوصول لجمهور بمكان معيّن بكل دقة.

نصيحة: كلما ارتفع عدد الجمهور المستهدف في النطاق الجغرافي كلما قلت الكلفة والعكس صحيح.
العمر
تحديد العمر عند الاستهداف في الفيس بوك من المميزات المهمة كي تصل للجمهور المناسب لطبيعة المنتج أو الخدمة التي تقدمها، ويمكن استهداف الأعمار من 13-65.

نصيحة: وننصح دائمًا بعدم فصل الأعمار في مجموعات إعلانية إلا حال اضطررت لفعل ذلك، لأنه عليك التأكد بأن فصل الأعمار سيؤدي إلى زيادة التكلفة بشكل عام، نتحدث عن CPC, CPM Cost/Result.
الجنس
بطبيعة الحال الاستهداف في إعلانات فيسبوك يمكنك تحديد من تريد أن يشاهد إعلانك، الذكور أم الإناث أم كلاهما، وعليك الاختيار بناء على طبيعة المنتج أو الخدمة التي تقدمها.

نصيحة: فصل الجنس في مجموعات إعلانية (Adset) مختلفة يرفع التكلفة، لذا ننصح بعدم الفصل إلا إن اضطررت إلى ذلك، ولا تنسى أن تحدد الجنس بناء على طبيعة منتجك، بعض المنتجات يهم الجنسين وبعضها أحدهما.
اللغة
شخص ما يستخدم الفيس بوك الإنجليزي، وشخص آخر يستخدمه باللغة العربية، أما الشخص الثالث يستخدمه باللغة الألمانية، هل ترغب باستهدافهم جميعًا في إعلانك المكتوب باللغة العربية؟ حتمًا لا، لهذا أتاح الفيس بوك ميزة تحديد اللغة المستهدفة، وتشمل كافة لغات العالم.

نصيحة: في بعض البلدان مثل الأردن، لا بأس لو تركت خيار اللغة دون تحديد، لأن الثقافة واحدة تقريبًا، بينما لو أنشأت إعلان باللغة الإنجليزية واستهدفت المانيا، ولكن لم تحدد اللغة، بهذه الحالة سيصل إعلانك لأشخاص لا يتحدثون الإنجليزية ولن يُحركوا ساكنًا عند مشاهدته، ما يعني انخفاض حاد بنسبة النقر للظهور، وبالتالي ازدياد حاد بالتكاليف وانخفاض جودة الإعلان مقارنة بالمنافسين، لذا كن حذرًا وحدد اللغة في مثل هذه الحالات، وغالب الحالات الأخرى عليك تحديد اللغة كذلك فهذا مُفضّل.
الاهتمامات
استهداف اهتمامات محددة بعينها لا يعني أنك استهدفت بالفعل من يهتم بها بالضبط وحصرًا، على سبيل المثال إن كان الهدف من إعلانك الوصول للشباب الذين يهتمون بشامبو كلير ولديهم الرغبة بشراءه، فلا تعتقد أنه بحال إضافة قائمة اهتمام “شامبو كلير” سيعرض إعلانك فقط على الأشخاص المهتمين بهذا البراند، لأن القائمة قد تضم أشخاصًا غير مهتمين، وللحصول على المزيد من المعلومات عن الاهتمامات، اقرأ مقال: نقوم حاليًا بتحرير المقال، عند جهوزيته، تجده هنا!

نصيحة: دائمًا أضف مجموعة متعلقة بمنتجك من الاهتمامات، وننصح بفصل الاهتمامات كل واحدة في مجموعة إعلانية مختلفة بشرط عدم حدوث تداخل “overlap” تزيد نسبته عن 30% بين أي مجموعتين مختلفتين من الاهتمامات، وكي تعرف أكثر عن الـ Overlap
الاستهداف الديموغرافي (السكاني)
نتحدث هنا عن إمكانية الوصول للجمهور للأشخاص بناء على التعليم، التوظيف، الأشخاص المعاليين بالمنزل، وتفاصيل نمط الحياة.
من أحد الأشياء التي يمكن استهدافها هنا عدد الأولاد المعالين، مثلًا والدين مع أبناء تتراوح أعمارهم بين 18-26 عام، وكذلك الحال يمكنك استهداف الأشخاص بناء على حالتهم الاجتماعية، متزوج، مطلق.. إلخ!

نصيحة: افصل بين الاهتمامات والاستهداف الديموغرافي في مجموعات إعلانية مختلفة، أو حتى حملات منفصلة، لأن الجمهور المتشابك Overlap في هذه الحالات قد يكون كبير جدًا، إضافة إلى أن الفصل سيسهل عليك معرفة أي الأفضل بينهما.
السلوكيات
أما السلوكيات فهو إمكانية الوصول للأشخاص بناء على سلوك الشراء أو النوايا، نوع الجهاز المحمول، وحتى التوجّهات السياسية، بل وأكثر من هذا بكثير! يا له من أسلوب استهداف رائع ومميز سيعطيك الكثير من الفرص.

نصيحة: افصل المجموعة الإعلانية التي تحتوي على قائمة سلوكيات عن الاهتمامات والاستهداف الديموغرافي، إلا إن اضططرت لفعل ذلك وبحالات معينة فقط.
المواضع أو أماكن ظهور الإعلان
يوجد عدة أماكن يمكن أن تظهر فيه إعلاناتك بالفيس بوك، مثل التغذية الإخبارية News Feed في الفيس بوك أو الانستاغرام، أو في الماسنجر، أو في شبكة الجمهور Audience Network والتي ترتبط بشكل مباشر بالتطبيقات الشريكة للفيس بوك.

نصيحة: من الجيد تحديد المواضع التلقائي Automatic Placement، ولكن قد يؤدي هذا إلى إهدار الميزانية وتقليل نسبة النقر للظهور CTR وبالتالي يرفع من تكلفة الإعلانات عمومًا، ذلك قد يكون من الأفضل الفصل بشكل خاص بين التغذية الإخبارية في الفيس بوك وتلك في الانستاغرام.
العلاقات Connections
هنا يمكنك استهداف الأشخاص المعجبين بصفحتك على الفيس بوك، أو أصدقاء الأشخاص المعجبين بصفحتك، أو استثناء الأشخاص المعجبين بصفحتك، ونفس الحال ينطبق على التطبيق، حيث يمكنك استهداف مستخدمي التطبيق الخاص بك، أو أصدقائهم، ويمكنك استثناء مستخدمي التطبيق.

نصيحة: إن إذا كان الهدف من إعلانك زيادة عدد معجبي الصفحة، قم باستثناء الأشخاص المعجبين بها كي لا تصلهم مرة أخرى وتخبرهم بالانضمام إليها وهم بالأساس معجبين بها، وبالعادة فإن هذا الاختيار تلقائي، ولكن تأكد منه قبل إطلاق إعلانك.
نوع الأجهزة المحمولة ونوع ونظام التشغيل
استهداف مستخدمي الأندرويد، أو مستخدمي الـ IOS أو كلاهما متاح، ويمكن كذلك تحديد مستخدمي نسخة محددة من الأندرويد، وتحديد الهواتف المحمولة فقط أو الأجهزة اللوحية Tablets.

نصيحة: إذا لاحظت ارتفاع تكاليف الإعلانات التي تظهر لمستخدمي الأي أو أس، يمكنك إطلاق إعلان خاص بمستخدمي الأندرويد حصرًا، رغم أننا لا ننصح بذلك لأنه وكما ذكرنا سابقًا، تضييق نطاق الاستهداف بكافة أشكاله غير محبذ في إعلانات فيس بوك.

من أروع الخيارات المتاحة إمكانية استهداف مستخدمي الفيس بوك الذين يتصلون بالإنترنت من خلال الواي فاي باللحظة الفعلية التي يظهر لهم فيها الإعلان.
نصيحة: من الجيد تجربة إعلان لمدة أسبوع دون تحديد هذا الخبار، وبالأسبوع التالي تحديد هذا الخيار للتعرف على فرق النتائج وسلوكيات الجمهور المستهدف بكلتا الحالتين.
ملخص الاستهداف في الفيس بوك
ما يجعل إعلانات الفيس بوك هي الأفضل من وجهة نظرنا، أنه يُتيح للمعلنين إمكانية الوصول لجمهور محدد بدقة كبيرة جدًا، وعند تحديد خصائص وشخصية العميل المثالي Persona أو شخصية المشتري Buyer Persona، يمكنك تطبيقها بدقة في إعلانات الفيس بوك، وهذا يساعد في عدم إهدار الميزانيات الإعلانية على أشخاص غير مهتمين بإعلانك مطلقًا ولا يوجد لديهم نية لذلك، ومن الصعب الوصول إلى شخصية الزبون من خلال الشبكات الإعلانية الأخرى، لذا الاستهداف في الفيس بوك لن تجد له شبيه مهما بلغنا من كلام، والله ولي التوفيق.